相关文档
- Nuxt.js
- Pinia
- pinia-plugin-persistedstate
- NuxtUI
- Shadcn-vue
- Vant
- Iconify
- TailwindCSS
- TypeScript
- ESLint
- Prettier
项目初始化
pnpm dlx nuxi init🥧一步到胃
如果你不想尝试一次手动搭建基础模板的过程,那么也可以直接食用Nuxt团队的Anthony Fu大佬的模板
配置EditorConfig
根目录新建.editorconfig,填入如下内容
# https://editorconfig.org
root = true

[*]
charset = utf-8
indent_style = space
indent_size = 2
end_of_line = lf
insert_final_newline = true
trim_trailing_whitespace = true

[*.md]
insert_final_newline = false
trim_trailing_whitespace = false配置ESLint和Prettier
⚡ 注意
由于 Nuxt 的官方初始模板缺少了ESLint和Prettier等配置,所以需要自己手动安装
这个方案废弃,因为有大佬做了个整合插件,看下面
- ESLint
npx eslint --init选第二个
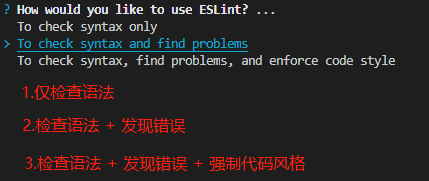
选第一个
选 Vue

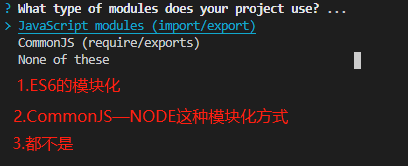
选TypeScript,然后运行环境按a全选

ESLint配置文件的的保存格式,选第一个

是否立即安装所需的依赖,选 Yes

这里根据项目构建所使用的包管理器进行选择,因为本项目使用pnpm,所以选第三个

- Prettier
pnpm add -D prettier eslint-config-prettier eslint-plugin-prettier根目录新建.prettierrc文件,填入自己喜欢的配置
{
  "$schema": "https://json.schemastore.org/prettierrc",
  "semi": false,
  "tabWidth": 2,
  "printWidth": 120,
  "singleQuote": true,
  "trailingComma": "all"
}- ESLint和Prettier的忽略文件
根目录新建.eslintignore和.prettierignore文件,填入自己喜欢的配置
.DS_Store
node_modules
dist
.idea
.vscode
.nuxt- 在
.eslintrc.js中集成Prettier
module.exports = {
  // ...
  extends: [
    // ...
    'prettier',
    'plugin:prettier/recommended',
  ],
  parser: 'vue-eslint-parser',
  plugins: ['@typescript-eslint', 'vue', 'prettier'],
  rules: {
    complexity: ['error', 10],
    'prettier/prettier': 'error',
    'no-console': process.env.NODE_ENV === 'production' ? 'warn' : 'off',
    'no-debugger': process.env.NODE_ENV === 'production' ? 'warn' : 'off',
    // ...
  },
}✨新方案,直接使用Nuxt团队的Anthony Fu大佬的eslint-config
pnpm dlx @antfu/eslint-config@latest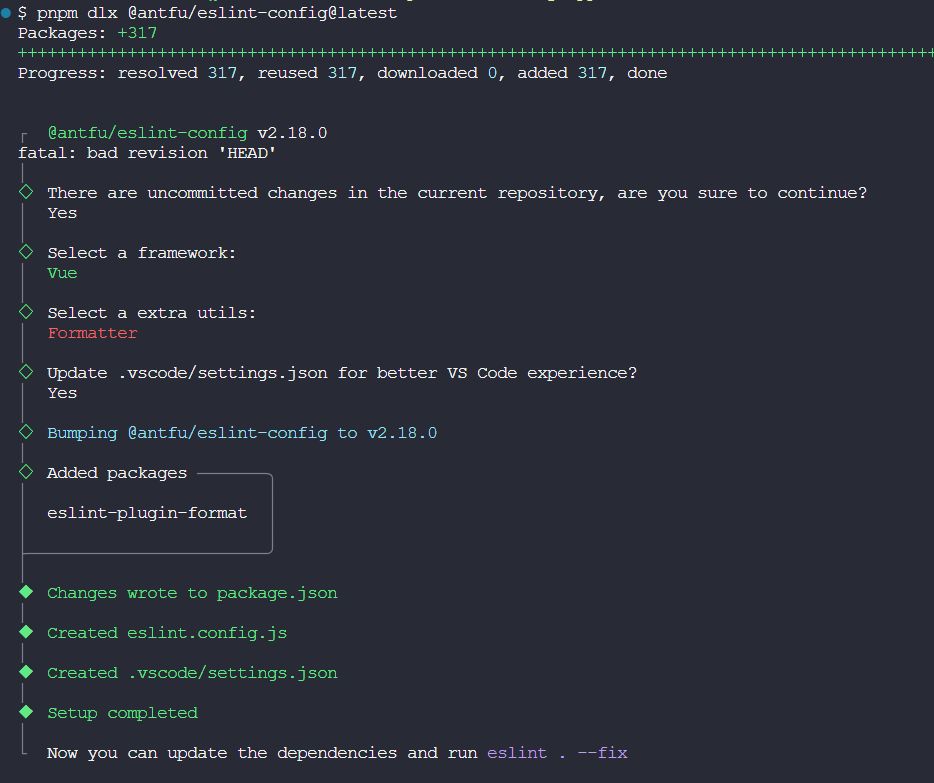
编辑eslint.config.js和nuxt.config.ts
import antfu from '@antfu/eslint-config'
import withNuxt from './.nuxt/eslint.config.mjs'

export default withNuxt(
  antfu({
    ignores: [
      'node_modules',
      '**/node_modules/**',
      'dist',
      '**/dist/**',
      '.nuxt',
      '**/.nuxt/**',
      '.output',
      '**/.output/**',
    ],
    formatters: true,
    typescript: true,
    vue: true,
  })
)export default defineNuxtConfig({
devtools: { enabled: true },
modules: ['@nuxt/eslint'],
eslint: {
config: {
standalone: false,
},
},
})由于 Anthony Fu 大佬的这套eslint-config默认禁用prettier,如果你想配合prettier一起用的话就安装它(不用的话就跳过),然后在根目录新建.prettierrc,填入自己喜欢的配置
pnpm add -D prettier{
"$schema": "https://json.schemastore.org/prettierrc",
"semi": false,
"tabWidth": 2,
"printWidth": 120,
"singleQuote": true,
"trailingComma": "es5"
}接着编辑.vscode/settings.json,把prettier启用即可
{
  "prettier.enable": true
  // ...
}TypeScript检查
pnpm add -D typescript vue-tsc编辑package.json
{
  "scripts": {
    // ...
    "typecheck": "vue-tsc --noEmit"
  }
}环境变量
关于 Nuxt3 的环境变量详细文档看这里
Nuxt 在运行或者打包生产环境时都是使用dotenv来加载.env文件中的环境变量的
新建.env文件,填入项目所需的环境变量。注意,环境变量名必须以,早期还没发布正式版本的时候是这样,现在已经不强制要求NUXT_开头,否则不会被识别NUXT_开头了
NUXT_APP_NAME=nuxt-starter
NUXT_APP_HOST=localhost
NUXT_APP_PORT=3000
NUXT_API_SECRET=secret_string使用
- 在
nuxt.config.ts中可以通过runtimeConfig配置项透传环境变量到应用中
runtimeConfig配置项中的app和public变量被暴露到客户端中,而与它们平级的其他变量则只会在服务端可用
export default defineNuxtConfig({
  // ...
  runtimeConfig: {
    apiSecret: process.env.NUXT_API_SECRET,
    app: {
      appName: process.env.NUXT_APP_NAME,
    },
    public: {
      appName: process.env.NUXT_APP_NAME,
    },
  },
})- 在
nuxt.config.ts中可以通过appConfig配置项透传环境变量到应用中
注意,这种方式透传的所有变量都会暴露到客户端中,所以不要把敏感信息放到这里
export default defineNuxtConfig({
  // ...
  appConfig: {
    apiSecret: process.env.NUXT_API_SECRET,
    appName: process.env.NUXT_APP_NAME,
  },
})- 在
app.config.ts文件中定义全局变量
Nuxt3 会把nuxt.config.ts中的appConfig配置项合并到app.config.ts中,且这里的变量可以在应用的运行生命周期内进行动态更新
export default defineAppConfig({
  haha: 'i am defined in app.config.ts',
  apiSecret: undefined,
  appName: 'what is this app',
})export default defineNuxtConfig({
// ...
appConfig: {
test: 'pass from nuxt.config.ts',
apiSecret: process.env.NUXT_API_SECRET,
appName: process.env.NUXT_APP_NAME,
},
})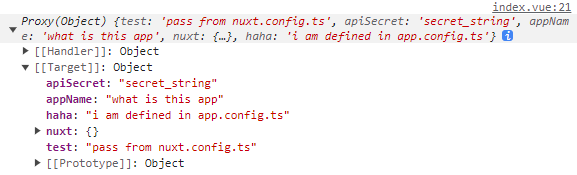
⚡注意
这个文件有点特别,在这里无法读取到环境变量的值,但可以在这里定义一些有明确初始值的变量。这个文件的作用更像是预先定义一些占位的变量,等待nuxt.config.ts中的appConfig合并到此,然后在应用运行生命周期内进行修改
Color-mode
pnpm add -D @nuxtjs/color-mode编辑nuxt.config.ts,注册@nuxtjs/color-mode模块
export default defineNuxtConfig({
  modules: [
    // ...
    '@nuxtjs/color-mode',
  ],
})Vueuse
pnpm add -D @vueuse/nuxt编辑nuxt.config.ts,注册@vueuse/nuxt模块
export default defineNuxtConfig({
  modules: [
    // ...
    '@vueuse/nuxt',
  ],
})PWA
pnpm add -D @vite-pwa/nuxt编辑nuxt.config.ts,注册@vite-pwa/nuxt模块
export default defineNuxtConfig({
  modules: [
    // ...
    '@vite-pwa/nuxt',
  ],
})状态管理
pnpm add -D pinia @pinia/nuxt编辑nuxt.config.ts,注册@pinia/nuxt模块并设置自动导入,同时指定store目录
export default defineNuxtConfig({
  modules: [
    // ...
    ['@pinia/nuxt', { autoImports: ['defineStore'] }],
  ],
  imports: { dirs: ['./store'] },
})持久化
pnpm add -D @pinia-plugin-persistedstate/nuxt编辑nuxt.config.ts,注册@pinia-plugin-persistedstate/nuxt模块
export default defineNuxtConfig({
  modules: [
    // ...
    '@pinia-plugin-persistedstate/nuxt',
  ],
})TailwindCSS
pnpm add -D @nuxtjs/tailwindcss编辑nuxt.config.ts,注册@nuxtjs/tailwindcss模块
export default defineNuxtConfig({
  modules: [
    // ...
    '@nuxtjs/tailwindcss',
  ],
})虽然官方文档说这样就行了,assets/css/tailwind.css和tailwind.config.js这两个文件会在执行npm run dev后自动生成到.nuxt目录中
但是...在实际使用过程肯定会需要给 TailwindCSS 扩展点内容的,而根据配置文件功能尽量单一的原则,还是建议手动创建这两个文件
- 初始化 TailwindCSS
pnpm dlx tailwindcss init在根目录新建assets/css/tailwind.css文件,如果缺少相应的文件夹则顺便创建一下,填入如下内容
@tailwind base;
@tailwind components;
@tailwind utilities;编辑tailwind.config.js
/** @type {import('tailwindcss').Config} */
export default {
  content: [
    './components/**/*.{vue,jsx,tsx}',
    './layouts/**/*.{vue,jsx,tsx}',
    './pages/**/*.{vue,jsx,tsx}',
    './plugins/**/*.{js,ts}',
    './app.{vue,jsx,tsx}',
    './nuxt.config.{js,ts}',
  ],
  corePlugins: {
    preflight: true,
  },
  plugins: [],
}类排序插件
pnpm add -D prettier prettier-plugin-tailwindcss编辑.prettierrc,注册插件
{
  "plugins": ["prettier-plugin-tailwindcss"]
}debug插件
pnpm add -D tailwindcss-debug-screens编辑tailwind.config.js,注册插件
/** @type {import('tailwindcss').Config} */
export default {
  // ...
  theme: {
    debugScreens: {
      position: ['bottom', 'right'],
      ignore: ['dark'],
    },
  },
  plugins: [
    process.env.NODE_ENV === 'development' && require('tailwindcss-debug-screens'),
  ],
}设置字体
编辑tailwind.config.js
const { fontFamily } = require('tailwindcss/defaultTheme')
/** @type {import('tailwindcss').Config} */
export default {
  // ...
  theme: {
    // ...
    extend: {
      fontFamily: {
        sans: ['Inter var', 'Inter', ...fontFamily.sans],
      },
    },
  },
}Iconify图标
这里以tailwind使用lucide图标集为例
pnpm add -D @iconify/tailwind @iconify-json/lucide编辑tailwind.config.js,注册插件
/** @type {import('tailwindcss').Config} */
export default {
  // ...
  plugins: [
    // ...
    require('@iconify/tailwind').addDynamicIconSelectors(),
  ],
}在页面中的使用方式有如下两种
<template>
  <span class="icon-[lucide--contrast]"></span>
  <span class="i-lucide-contrast"></span>
</template>封装成组件的话,可以参考如下
<script setup lang="ts">
import type { HTMLAttributes } from 'vue'
import { cn } from '../libs'
interface Props {
  name: string
  class?: HTMLAttributes['class']
}
defineOptions({
  name: 'Iconify',
})
const props = withDefaults(defineProps<Props>(), {
  class: 'w-5 h-5',
})
</script>

<template>
  <span :class="cn(props.name, props.class)"></span>
</template>UI框架
使用NuxtUI
pnpm add -D @nuxt/ui编辑nuxt.config.ts,注册@nuxt/ui模块。由于@nuxt/ui内置且自动加载@nuxtjs/tailwindcss和@nuxtjs/color-mode模块,所以这两个可以移除掉了
export default defineNuxtConfig({
  modules: [
    // ...
    '@nuxt/ui',
    '@nuxtjs/tailwindcss',
    '@nuxtjs/color-mode',
  ],
})使用Shadcn
由于Shadcn和TailwindCSS是绑定在一起的,所以请务必先安装TailwindCSS
pnpm add -D shadcn-nuxt编辑nuxt.config.ts,注册shadcn-nuxt模块
export default defineNuxtConfig({
  modules: [
    // ...
    'shadcn-nuxt',
  ],
  shadcn: {
    prefix: '',
    componentDir: './components/ui',
  },
})接着执行命令初始化Shadcn-vue
pnpm dlx shadcn-vue@latest init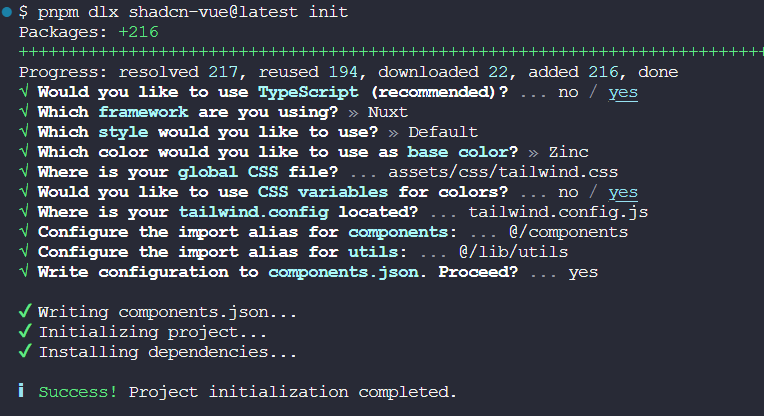
使用Vant
pnpm add -D vant @vant/nuxt编辑nuxt.config.ts,注册@vant/nuxt模块并设置懒加载
export default defineNuxtConfig({
  modules: [
    // ...
    '@vant/nuxt',
  ],
  vant: { lazyload: true },
})移动端适配
安装所需依赖,此插件的参数配置文档看这里
pnpm add -D postcss-px-to-viewport-8-plugin⚡注意
由于Vant使用的设计稿宽度是375,而通常情况下,设计师使用的设计稿宽度更多是750,那么Vant组件在750设计稿下会出现样式缩小的问题
解决方案: 当读取的node_modules文件是vant时,那么就将设计稿宽度变为375,读取的文件不是vant时,就将设计稿宽度变为750
编辑nuxt.config.ts文件,增加如下postcss配置项
import path from 'path'
export default defineNuxtConfig({
  // ...
  postcss: {
    plugins: {
      'postcss-px-to-viewport-8-plugin': {
        viewportWidth: (file: string) => {
          return path.resolve(file).includes(path.join('node_modules', 'vant')) ? 375 : 750
        },
        unitPrecision: 6,
        landscapeWidth: 1024,
      },
    },
  },
})🔔
如果通过exclude: [/node_modules\/vant/i]直接忽略Vant的话,那么viewportWidth则可以直接给个固定的值而不是传入函数进行处理
Docker本地部署
项目根目录新建Dockerfile、docker-compose.yml、.dockerignore和nginx.conf,具体内容参考如下
# 阶段一:安装依赖
#
# 使用官方Node.js 20镜像
FROM node:20 as dependency-stage
# 设置工作目录为/app
WORKDIR /app
# 复制项目的package.json和package-lock到工作目录
COPY package.json package-lock.* ./
# 安装项目依赖,使用中国镜像加速
RUN npm install -g pnpm --registry=https://registry.npmmirror.com
RUN pnpm install --registry=https://registry.npmmirror.com

# 阶段二:构建应用
#
# 以阶段一作为运行环境
FROM dependency-stage as build-stage
# 复制项目所有文件到工作目录
COPY . .
# 构建项目
RUN pnpm run build && pnpm run generate

# 阶段三:生产部署
#
# 使用官方nginx:latest镜像
FROM nginx:latest
# 删除ngnix的默认页面
RUN rm -rf /usr/share/nginx/html/*
# 删除nginx默认配置
RUN rm /etc/nginx/conf.d/default.conf
# 复制自定义nginx配置到容器中
COPY nginx.conf /etc/nginx/conf.d/default.conf
# 将阶段二构建产物复制到nginx的服务目录
COPY --from=build-stage /app/dist /usr/share/nginx/html
# 暴露80端口
EXPOSE 80
# 将nginx转为前台进程
CMD ["nginx", "-g", "daemon off;"]version: '3.8'
services:
web_app: #服务名
build: # 使用Dockerfile构建镜像
context: . # 指定 Dockerfile 所在目录
dockerfile: Dockerfile # 指定 Dockerfile 文件名
container_name: nuxt-app # 容器名称
restart: always # 自动重启
ports:
- 5000:80node_modules
dist
.git
.nuxt
.output
README.mdserver {
listen 80;
# 设置服务器名称,本地部署时使用localhost
server_name localhost;
# 设置网站根目录位置
root /usr/share/nginx/html;
# 网站首页
index index.html index.htm;
error_page 404 /404.html;
location / {
# 设置HTTP头部,禁用缓存策略
add_header Cache-Control no-cache;
try_files $uri $uri/ /index.html;
}
}docker-compose一键部署
docker-compose up --build -d在宿主机浏览器中访问http://localhost:5000