⚡ 记一次开发 VitePress 代码演示功能插件的经历
此插件项目是一个使用pnpm+workspace+changesets构建的单仓库多项目的monorepo工程
涉及到的核心技术有
- Vite虚拟模块
- 手动管理HMR热更新
unified+remark解析markdownmarkdown-it自定义渲染
实现原理:利用 Vite 插件的transform钩子读取 markdown 内容,使用 unified+remark 解析出自定义 markdown 容器中的代码块,然后将代码块转换为虚拟模块,最后是使用markdown-it对虚拟模块进行自定义渲染
相关文档
Rollup钩子生命周期
由于 Vite 的插件钩子函数扩展自 Rollup,所以在开始构建项目前,先来看一看 Rollup 的钩子生命周期
async:钩子还可以返回解析为相同类型值的 Promise; 否则,该钩子标记为syncfirst:如果多个插件实现此钩子,则钩子将按顺序运行,直到钩子返回null或undefined以外的值sequential:如果多个插件实现了此钩子,则所有插件都将按照指定的插件顺序运行。如果某个钩子是async,则此类后续钩子将等待,直到当前钩子被解析parallel:如果多个插件实现了此钩子,则所有插件都将按照指定的插件顺序运行。 如果一个钩子是async,则后续的此类钩子将并行运行,而不等待当前的钩子
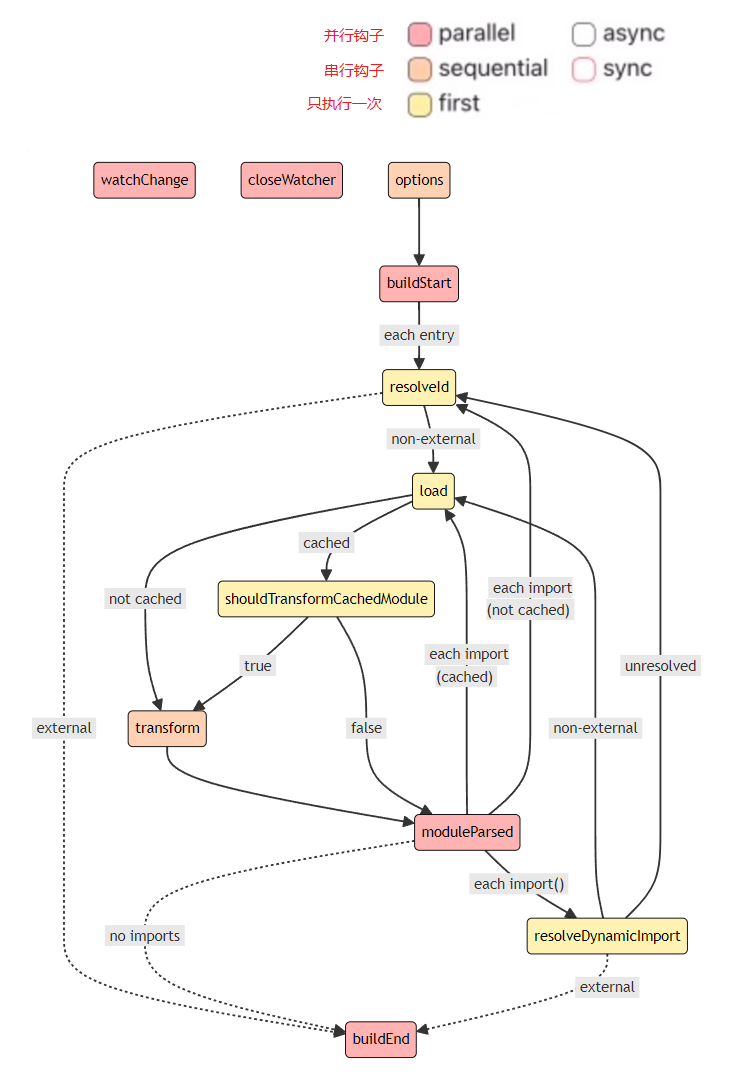
项目初始化
# 创建项目的根目录
mkdir code-preview && cd code-preview
git init
touch .gitignore
touch .editorconfig
# 示例项目的目录
mkdir docs
# 插件项目目录
mkdir packages/plugin -p
# 演示代码运行所需的容器组件项目
mkdir packages/containerdist
node_modules
docs/.vitepress/cache
docs/.vitepress/dist
.DS_Store
# Logs
logs
*.log
npm-debug.log*
yarn-debug.log*
yarn-error.log*
# Windows shortcuts
*.lnk# http://editorconfig.org
root = true
[*]
indent_style = space
indent_size = 2
end_of_line = lf
charset = utf-8
trim_trailing_whitespace = true
insert_final_newline = true
[*.md]
trim_trailing_whitespace = false
[Makefile]
indent_style = tabpnpm初始化
pnpm init
# 声明工作空间
touch pnpm-workspace.yaml编辑pnpm-workspace.yaml,把上面创建的几个目录添加进去
packages:
  - 'docs'
- 'packages/*'接着再编辑package.json,把主项目的名称改为vitepress-code-preview,以及添加如下内容
{
  "name": "vitepress-code-preview",
  // ...
  "workspaces": ["docs", "packages/*"],
  "scripts": {
    // 表示此项目只允许使用 pnpm
    "preinstall": "npx only-allow pnpm"
  },
  // 包管理器的版本根据自己的情况修改
  "packageManager": "pnpm@8.10.0",
  "engines": {
    "node": ">= 16"
  }
}TS环境初始化
因为当前已经转变为workspace工作空间,所以在主项目下安装依赖时需要加一个-w参数
pnpm add -wD typescript @types/node
npx tsc --init{
"compilerOptions": {
"module": "esnext",
"target": "esnext",
"jsx": "preserve",
"moduleResolution": "node",
"strict": true,
"sourceMap": true,
"allowJs": true,
"declaration": true,
"skipLibCheck": true,
"resolveJsonModule": true,
"noUnusedLocals": true,
"strictNullChecks": true,
"esModuleInterop": true,
"forceConsistentCasingInFileNames": true
},
"exclude": ["dist", "node_modules"]
}ESLint初始化
由于 ESLint 的问题,无法传递-w参数给 pnpm 会导致初始化时依赖安装失败,所以改成手动安装相关依赖。当然你也可以先进行 ESLint 的初始化,然后再将项目改为workspace工作空间。
npx eslint --init
pnpm add -wD eslint @typescript-eslint/parser @typescript-eslint/eslint-plugin eslint-plugin-vuePrettier初始化
pnpm add -wD prettier eslint-config-prettier eslint-plugin-prettier
touch .prettierrc{
"$schema": "https://json.schemastore.org/prettierrc",
"semi": false,
"tabWidth": 2,
"singleQuote": true,
"printWidth": 100,
"trailingComma": "es5"
}整合ESLint和Prettier
查看
module.exports = {
  root: true,
  env: {
    browser: true,
    es2021: true,
    node: true,
  },
  extends: [
    'eslint:recommended',
    'plugin:@typescript-eslint/recommended',
    'plugin:vue/vue3-essential',
    'prettier',
    'prettier/@typescript-eslint',
  ],
  overrides: [
    {
      env: {
        node: true,
      },
      files: ['.eslintrc.{js,cjs}'],
      parserOptions: {
        sourceType: 'script',
      },
    },
  ],
  parserOptions: {
    ecmaVersion: 'latest',
    parser: '@typescript-eslint/parser',
    sourceType: 'module',
  },
  plugins: ['@typescript-eslint', 'vue'],
  rules: {
    complexity: ['error', 10],
    'prettier/prettier': 'error',
    'no-console': process.env.NODE_ENV === 'production' ? 'warn' : 'off',
    'no-debugger': process.env.NODE_ENV === 'production' ? 'warn' : 'off',
  },
}docs示例项目配置
进入docs目录,在里面也进行 pnpm 的初始化,然后把docs下的package.json的name字段值设置为code-preview-example,表示此子项目的名称叫做code-preview-example
cd docs
pnpm init{
"name": "code-preview-example",
// ...
"type": "module",
"peerDependencies": {
"vue": "^3.3.0"
},
"packageManager": "pnpm@8.10.0",
"engines": {
"node": ">= 16"
}
}接着再开始安装 VitePress
⚡ 提示
给子项目安装依赖时,需要使用--filter参数,参数的后面可以指定子项目的目录,也可以指定子项目的名称(就是package.json的name字段值),或者也可以直接进入子项目的目录内执行安装
pnpm add -D vitepress --filter ./docs
pnpm vitepress init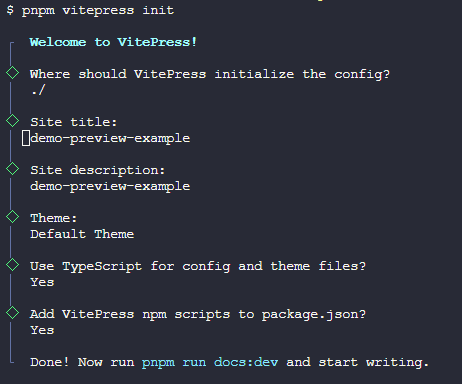
TS配置
新建docs/tsconfig.json,填入如下配置
{
  "extends": "../tsconfig.json",
  "compilerOptions": {
    "paths": {
      "~/*": ["./.vitepress/*"]
    }
  },
  "include": ["**/*"],
  "exclude": ["node_modules", "dist", ".vitepress/cache"]
}安装Vite
pnpm add -D vite @vitejs/plugin-vue-jsx --filter ./docs新建docs/vite.config.ts
import { defineConfig } from 'vite'
import vueJsx from '@vitejs/plugin-vue-jsx'

export default defineConfig({
  plugins: [vueJsx()],
})然后执行pnpm docs:dev试试,不出意外的话,应该可以看到 VitePress 启动成功了
我们继续配置其他子项目
container项目配置
进入packages/container目录,新建tsconfig.json,填入如下配置
{
  "extends": "../../tsconfig.json",
  "include": ["**/*.vue", "**/*.ts", "**/*.d.ts"]
}同样的,这里也要进行 pnpm 的初始化,但这回是使用 npm(因为pnpm目前不支持--scope参数),并且加上--scope参数表明这是一个带命名空间的包
npm init --scope=@vitepress-code-preview接着再手动修改一下package.json
{
  "name": "@vitepress-code-preview/container",
  // ...
  "type": "module",
  "peerDependencies": {
    "vue": "^3.3.0"
  },
  "packageManager": "pnpm@8.10.0",
  "engines": {
    "node": ">= 16"
  }
}plugin项目配置
同样的,进入packages/plugin目录,新建tsconfig.json,填入如下配置
{
  "extends": "../../tsconfig.json",
  "include": ["**/*.ts", "**/*.d.ts"]
}接着使用 npm 初始化一下,并加上--scope参数
npm init --scope=@vitepress-code-preview老样子,手动修改一下package.json
{
  "name": "@vitepress-code-preview/plugin",
  // ...
  "type": "module",
  "packageManager": "pnpm@8.10.0",
  "engines": {
    "node": ">= 16"
  }
}⚡ 到这里,项目的所有基础配置就完成了,接下来开始插件逻辑的开发讲解
container项目开发
先来把示例代码运行所需的容器组件给开发了,就和平时开发先做好静态页面差不多
安装一下基础依赖
pnpm add vue --filter ./packages/container
pnpm add -D vite vitepress @vitejs/plugin-vue-jsx @vitejs/plugin-vue --filter ./packages/container样式
新建packages/container/style/index.css,把需要用到的 VitePress 的 css 变量包装一下,不合适的情况再自己新增
查看
:root {
  --preview-white: var(--vp-c-white);
  --preview-black: var(--vp-c-black);
  --preview-bg: var(--vp-c-bg);
  --preview-green-3: var(--vp-c-green-3);
  --preview-soft: var(--vp-c-bg-soft);
  --preview-mute: var(--vp-c-bg-mute);
  --preview-border: rgb(240, 240, 240);
  --preview-divider: var(--vp-c-divider);
  --preview-text-1: var(--vp-c-text-1);
  --preview-text-2: var(--vp-c-text-2);
  --preview-text-3: var(--vp-c-text-3);
  --preview-text-4: var(--vp-c-text-4);
  --preview-code-block-bg: #343030;
  --preview-primary-color: var(--vp-c-brand);
}

.dark:root {
  --preview-white: var(--vp-c-white);
  --preview-black: var(--vp-c-black);
  --preview-bg: var(--vp-c-bg);
  --preview-green-3: var(--vp-c-green-3);
  --preview-soft: var(--vp-c-bg-soft);
  --preview-mute: var(--vp-c-bg-mute);
  --preview-border: rgb(240, 240, 240, 0.1);
  --preview-divider: var(--vp-c-divider);
  --preview-text-1: var(--vp-c-text-1);
  --preview-text-2: var(--vp-c-text-2);
  --preview-text-3: var(--vp-c-text-3);
  --preview-text-4: var(--vp-c-text-4);
  --preview-code-block-bg: #282626;
  --preview-primary-color: var(--vp-c-brand);
}悬浮提示组件
此组件的作用是:当鼠标悬浮在容器组件的一些操作按钮上时会出现气泡提示框,它使用到社区一个有名的包:@floating-ui 的 Vue 版本,所以先安装一下
pnpm add @floating-ui/vue --filter ./packages/container新建packages/container/components/Tooltip.vue,具体代码如下
查看
<template>
  <div :class="$style['example-tooltip']">
    <div ref="reference" v-on="componentProps">
      <slot />
    </div>
    <div ref="floating" v-show="showFloating" :class="[$style['example-tooltip-content']]">
      {{ content }}
    </div>
  </div>
</template>

<script setup lang="ts">
import { ref, defineProps } from 'vue'
import {
  offset,
  flip,
  shift,
  computePosition,
  Placement,
  ReferenceElement,
  FloatingElement,
} from '@floating-ui/vue'
defineOptions({
  name: 'Tooltip',
})
const props = defineProps<{ placement: Placement; content: string }>()
const reference = ref<ReferenceElement>()
const floating = ref<FloatingElement>()
const showFloating = ref(false)

const update = () => {
  computePosition(reference.value!, floating.value!, {
    placement: props.placement,
    middleware: [offset(10), flip(), shift()],
  }).then(({ x, y }) => {
    Object.assign(floating.value!.style, {
      left: 0,
      top: 0,
      transform: `translate(${x}px, ${y}px)`,
      willChange: 'transform',
      pointerEvents: 'none',
    })
  })
}
const showTooltip = () => {
  showFloating.value = true
  update()
}
const hideTooltip = () => {
  showFloating.value = false
}
const componentProps = {
  mouseenter: showTooltip,
  mouseleave: hideTooltip,
  focus: showTooltip,
  blur: hideTooltip,
}
</script>

<style module>
.example-tooltip {
  position: relative;
}

.example-tooltip-content {
  position: absolute;
  top: 0;
  left: 0;
  z-index: 1;
  width: max-content;
  min-width: 10px;
  padding: 5px 10px;
  font-size: 12px;
  line-height: 20px;
  border-radius: 4px;
  word-wrap: break-word;
  inset: 0 auto auto 0;
  color: var(--preview-white);
  background: #303133;
  border: 1px solid var(--preview-border);
}

.dark .example-tooltip-content {
  color: var(--preview-black);
  background: #e5eaf3;
  border: 1px solid var(--preview-border);
}
</style>手风琴组件
此组件是用来折叠隐藏示例组件的源码,需要查看的时候点击按钮将其展开,实现逻辑是我从 Element-Plus 那里扒出来的
这个手风琴组件还用到一个 hooks,作用是生成 BEM 格式的 css 类名
- 新建
packages/container/hooks/useNamespace.ts - 新建
packages/container/components/CollapseTransition.vue - 新建
packages/container/style/transition.css - 记得在
packages/container/style/index.css中导入transition.css
查看
// 从element-plus 抄来的, https://github.com/element-plus/element-plus/blob/dev/packages/hooks/use-namespace/index.ts
import { computed, getCurrentInstance, inject, ref, unref } from 'vue'
import type { InjectionKey, Ref } from 'vue'

export const defaultNamespace = 'el'
const statePrefix = 'is-'

const _bem = (
  namespace: string,
  block: string,
  blockSuffix: string,
  element: string,
  modifier: string
) => {
  let cls = `${namespace}-${block}`
  if (blockSuffix) {
    cls += `-${blockSuffix}`
  }
  if (element) {
    cls += `__${element}`
  }
  if (modifier) {
    cls += `--${modifier}`
  }
  return cls
}

export const namespaceContextKey: InjectionKey<Ref<string | undefined>> =
  Symbol('namespaceContextKey')

export const useGetDerivedNamespace = (namespaceOverrides?: Ref<string | undefined>) => {
  const derivedNamespace =
    namespaceOverrides ||
    (getCurrentInstance()
      ? inject(namespaceContextKey, ref(defaultNamespace))
      : ref(defaultNamespace))
  const namespace = computed(() => {
    return unref(derivedNamespace) || defaultNamespace
  })
  return namespace
}

export const useNamespace = (block: string, namespaceOverrides?: Ref<string | undefined>) => {
  const namespace = useGetDerivedNamespace(namespaceOverrides)
  const b = (blockSuffix = '') => _bem(namespace.value, block, blockSuffix, '', '')
  const e = (element?: string) => (element ? _bem(namespace.value, block, '', element, '') : '')
  const m = (modifier?: string) => (modifier ? _bem(namespace.value, block, '', '', modifier) : '')
  const be = (blockSuffix?: string, element?: string) =>
    blockSuffix && element ? _bem(namespace.value, block, blockSuffix, element, '') : ''
  const em = (element?: string, modifier?: string) =>
    element && modifier ? _bem(namespace.value, block, '', element, modifier) : ''
  const bm = (blockSuffix?: string, modifier?: string) =>
    blockSuffix && modifier ? _bem(namespace.value, block, blockSuffix, '', modifier) : ''
  const bem = (blockSuffix?: string, element?: string, modifier?: string) =>
    blockSuffix && element && modifier
      ? _bem(namespace.value, block, blockSuffix, element, modifier)
      : ''
  const is: {
    (name: string, state: boolean | undefined): string
    (name: string): string
  } = (name: string, ...args: [boolean | undefined] | []) => {
    const state = args.length >= 1 ? args[0]! : true
    return name && state ? `${statePrefix}${name}` : ''
  }

  // for css var
  // --el-xxx: value;
  const cssVar = (object: Record<string, string>) => {
    const styles: Record<string, string> = {}
    for (const key in object) {
      if (object[key]) {
        styles[`--${namespace.value}-${key}`] = object[key]
      }
    }
    return styles
  }
  // with block
  const cssVarBlock = (object: Record<string, string>) => {
    const styles: Record<string, string> = {}
    for (const key in object) {
      if (object[key]) {
        styles[`--${namespace.value}-${block}-${key}`] = object[key]
      }
    }
    return styles
  }

  const cssVarName = (name: string) => `--${namespace.value}-${name}`
  const cssVarBlockName = (name: string) => `--${namespace.value}-${block}-${name}`

  return {
    namespace,
    b,
    e,
    m,
    be,
    em,
    bm,
    bem,
    is,
    // css
    cssVar,
    cssVarName,
    cssVarBlock,
    cssVarBlockName,
  }
}

export type UseNamespaceReturn = ReturnType<typeof useNamespace><template>
<Transition :name="ns.b()" v-on="on">
<slot />
</Transition>
</template>
<script lang="ts" setup>
// 从element-plus 抄来的, https://github.com/element-plus/element-plus/blob/dev/packages/components/collapse-transition/src/collapse-transition.vue
import type { RendererElement } from 'vue'
import { useNamespace } from '../hooks/useNamespace'
defineOptions({
name: 'CollapseTransition',
})
const ns = useNamespace('collapse-transition')
const reset = (el: RendererElement) => {
el.style.maxHeight = ''
el.style.overflow = el.dataset.oldOverflow
el.style.paddingTop = el.dataset.oldPaddingTop
el.style.paddingBottom = el.dataset.oldPaddingBottom
}
const on = {
beforeEnter(el: RendererElement) {
if (!el.dataset) el.dataset = {}
el.dataset.oldPaddingTop = el.style.paddingTop
el.dataset.oldPaddingBottom = el.style.paddingBottom
el.style.maxHeight = 0
el.style.paddingTop = 0
el.style.paddingBottom = 0
},
enter(el: RendererElement) {
el.dataset.oldOverflow = el.style.overflow
if (el.scrollHeight !== 0) {
el.style.maxHeight = `${el.scrollHeight}px`
} else {
el.style.maxHeight = 0
}
el.style.paddingTop = el.dataset.oldPaddingTop
el.style.paddingBottom = el.dataset.oldPaddingBottom
el.style.overflow = 'hidden'
},
afterEnter(el: RendererElement) {
el.style.maxHeight = ''
el.style.overflow = el.dataset.oldOverflow
},
enterCancelled(el: RendererElement) {
reset(el)
},
beforeLeave(el: RendererElement) {
if (!el.dataset) el.dataset = {}
el.dataset.oldPaddingTop = el.style.paddingTop
el.dataset.oldPaddingBottom = el.style.paddingBottom
el.dataset.oldOverflow = el.style.overflow
el.style.maxHeight = `${el.scrollHeight}px`
el.style.overflow = 'hidden'
},
leave(el: RendererElement) {
if (el.scrollHeight !== 0) {
el.style.maxHeight = 0
el.style.paddingTop = 0
el.style.paddingBottom = 0
}
},
afterLeave(el: RendererElement) {
reset(el)
},
leaveCancelled(el: RendererElement) {
reset(el)
},
}
</script>/*
* 提取自element-plus https://github.com/element-plus/element-plus/blob/dev/packages/theme-chalk/src/common/transition.scss
*/
:root {
--el-transition-duration: 0.3s;
--el-transition-duration-fast: 0.2s;
--el-transition-function-ease-in-out-bezier: cubic-bezier(0.645, 0.045, 0.355, 1);
--el-transition-function-fast-bezier: cubic-bezier(0.23, 1, 0.32, 1);
--el-transition-all: all var(--el-transition-duration)
var(--el-transition-function-ease-in-out-bezier);
--el-transition-fade: opacity var(--el-transition-duration)
var(--el-transition-function-fast-bezier);
--el-transition-md-fade: transform var(--el-transition-duration)
var(--el-transition-function-fast-bezier),
opacity var(--el-transition-duration) var(--el-transition-function-fast-bezier);
--el-transition-fade-linear: opacity var(--el-transition-duration-fast) linear;
--el-transition-border: border-color var(--el-transition-duration-fast)
var(--el-transition-function-ease-in-out-bezier);
--el-transition-box-shadow: box-shadow var(--el-transition-duration-fast)
var(--el-transition-function-ease-in-out-bezier);
--el-transition-color: color var(--el-transition-duration-fast)
var(--el-transition-function-ease-in-out-bezier);
}
.fade-in-linear-enter-active,
.fade-in-linear-leave-active {
transition: var(--el-transition-fade-linear);
}
.fade-in-linear-enter-from,
.fade-in-linear-leave-to {
opacity: 0;
}
.el-fade-in-linear-enter-active,
.el-fade-in-linear-leave-active {
transition: var(--el-transition-fade-linear);
}
.el-fade-in-linear-enter-from,
.el-fade-in-linear-leave-to {
opacity: 0;
}
.el-fade-in-enter-active,
.el-fade-in-leave-active {
transition: all var(--el-transition-duration) cubic-bezier(0.55, 0, 0.1, 1);
}
.el-fade-in-enter-from,
.el-fade-in-leave-active {
opacity: 0;
}
.el-fade-in-enter-active,
.el-fade-in-leave-active {
transition: all var(--el-transition-duration) cubic-bezier(0.55, 0, 0.1, 1);
}
.el-fade-in-enter-from,
.el-fade-in-leave-active {
opacity: 0;
}
.el-zoom-in-center-enter-active,
.el-zoom-in-center-leave-active {
transition: all var(--el-transition-duration) cubic-bezier(0.55, 0, 0.1, 1);
}
.el-zoom-in-center-enter-from,
.el-zoom-in-center-leave-active {
opacity: 0;
transform: scaleX(0);
}
.el-zoom-in-top-enter-active,
.el-zoom-in-top-leave-active {
opacity: 1;
transform: scaleY(1);
transition: var(--el-transition-md-fade);
transform-origin: center top;
}
.el-zoom-in-top-enter-active[data-popper-placement^='top'],
.el-zoom-in-top-leave-active[data-popper-placement^='top'] {
transform-origin: center bottom;
}
.el-zoom-in-top-enter-from,
.el-zoom-in-top-leave-active {
opacity: 0;
transform: scaleY(0);
}
.el-zoom-in-bottom-enter-active,
.el-zoom-in-bottom-leave-active {
opacity: 1;
transform: scaleY(1);
transition: var(--el-transition-md-fade);
transform-origin: center bottom;
}
.el-zoom-in-bottom-enter-from,
.el-zoom-in-bottom-leave-active {
opacity: 0;
transform: scaleY(0);
}
.el-zoom-in-left-enter-active,
.el-zoom-in-left-leave-active {
opacity: 1;
transform: scale(1, 1);
transition: var(--el-transition-md-fade);
transform-origin: top left;
}
.el-zoom-in-left-enter-from,
.el-zoom-in-left-leave-active {
opacity: 0;
transform: scale(0.45, 0.45);
}
.collapse-transition {
transition:
var(--el-transition-duration) height ease-in-out,
var(--el-transition-duration) padding-top ease-in-out,
var(--el-transition-duration) padding-bottom ease-in-out;
}
.el-collapse-transition-leave-active,
.el-collapse-transition-enter-active {
transition:
var(--el-transition-duration) max-height ease-in-out,
var(--el-transition-duration) padding-top ease-in-out,
var(--el-transition-duration) padding-bottom ease-in-out;
}
.horizontal-collapse-transition {
transition:
var(--el-transition-duration) width ease-in-out,
var(--el-transition-duration) padding-left ease-in-out,
var(--el-transition-duration) padding-right ease-in-out;
}
.el-list-enter-active,
.el-list-leave-active {
transition: all 1s;
}
.el-list-enter-from,
.el-list-leave-to {
opacity: 0;
transform: translateY(-30px);
}
.el-list-leave-active {
position: absolute !important;
}
.el-opacity-transition {
transition: opacity var(--el-transition-duration) cubic-bezier(0.55, 0, 0.1, 1);
}@import './transition.css';
// ...容器组件本体
新建packages/container/components/DemoPreview.vue
简单说明一下
- 默认插槽是用来装载使用虚拟模块包装处理后的示例代码
highlight具名插槽是用来装载经过markdown-it高亮处理后的源码
查看
<template>
  <ClientOnly>
    <section :class="[$style.example]">
      <div :class="$style['example-showcase']">
        <slot />
      </div>
      <div :class="$style['example-divider--horizontal']"></div>
      <div :class="$style['example-actions']">
        <Tooltip placement="top" :content="locale['edit-in-playground']">
          <Playground v-if="lang === 'vue'" style="cursor: pointer" :code="decodedSource" />
        </Tooltip>
        <div :class="$style['example-actions--right']">
          <Tooltip placement="top" :content="locale['copy-code']">
            <Copy style="cursor: pointer" @click="copyCode" />
          </Tooltip>
          <Tooltip placement="top" :content="locale['view-source']">
            <Code style="cursor: pointer" @click="toggleExpanded" />
          </Tooltip>
        </div>
        <span v-show="copyTip" :class="$style['example-actions-tip']">{{
          locale['copy-success']
        }}</span>
      </div>
      <CollapseTransition>
        <div v-show="isExpanded" :class="$style['example-source-wrapper']">
          <template v-if="isFile">
            <div :class="`example-source language-${lang}`">
              <span class="lang">{{ lang }}</span>
              <div v-html="decodedHlSource"></div>
            </div>
          </template>
          <slot v-else name="highlight" />
        </div>
      </CollapseTransition>
      <Transition name="el-fade-in-linear">
        <div v-show="isExpanded" :class="$style['example-control']" @click="toggleExpanded">
          <span :class="$style['control-icon']"></span>
          <span :class="$style['control-text']">{{ locale['hide-source'] }}</span>
        </div>
      </Transition>
    </section>
  </ClientOnly>
</template>

<script setup lang="ts">
import { ref, defineProps, computed } from 'vue'
import CollapseTransition from './CollapseTransition.vue'
import Tooltip from './Tooltip.vue'
import Playground from './icons/SfcPlayground.vue'
import Copy from './icons/Copy.vue'
import Code from './icons/Code.vue'
import { useCopyCode } from '../hooks/useCopyCode'
import '../style/index.css'

interface DemoProps {
  lang: string // 源码类型
  source: string // 转码后的源码内容
  isFile: boolean // 是否为引入文件的模式
  hlSource?: string // 转码后的markdown高亮源码
}

defineOptions({
  name: 'DemoPreview',
})
const props = withDefaults(defineProps<DemoProps>(), {
  lang: 'vue',
  isFile: false,
  hlSource: '',
})
const locale = computed(() => {
  return {
    'view-source': '查看源代码',
    'hide-source': '隐藏源代码',
    'edit-in-playground': '在 Playground 中编辑',
    'copy-code': '复制代码',
    'copy-success': '复制成功',
  }
})
const decodedSource = computed(() => decodeURIComponent(props.source))
const decodedHlSource = computed(() => decodeURIComponent(props.hlSource))
const isExpanded = ref(false)
const toggleExpanded = () => {
  isExpanded.value = !isExpanded.value
}
const { copyTip, copyCode } = useCopyCode(decodedSource.value)
</script>

<style module>
:global(.vp-doc .example-source[class*='language-']) {
  margin: 0;
  border-radius: 0;
}
:global(.example-source[class*='language-'] code) {
  padding: 0 1rem;
}
.example {
  border: 1px solid var(--preview-border);
  border-radius: 1px;
  margin: 20px 0 50px;
}
.example-showcase {
  padding: 1rem;
  color: var(--preview-text-1);
  background-color: var(--preview-bg);
}

.example-divider--horizontal {
  display: block;
  height: 1px;
  width: 100%;
}
.example-actions {
  position: relative;
  display: flex;
  height: 40px;
  padding: 0 8px;
  align-items: center;
  justify-content: space-between;
  border-top: 1px dashed var(--preview-divider);
}

.example-actions--right {
  display: flex;
  align-items: center;
  gap: 15px;
}

.example-source-wrapper {
  overflow: hidden;
  border-top: 1px dashed var(--preview-divider);
  transition: 0.3s;
}
.example-control {
  display: flex;
  align-items: center;
  justify-content: center;
  border-top: 1px solid var(--preview-border);
  height: 44px;
  box-sizing: border-box;
  background-color: var(--preview-bg);
  color: var(--preview-text-2);
  cursor: pointer;
  position: sticky;
  left: 0;
  right: 0;
  bottom: 0;
  z-index: 10;
}

.example-control .control-text {
  margin-left: 10px;
  font-size: 14px;
}

.control-icon {
  content: '';
  width: 0;
  height: 0;
  border-right: 6px solid transparent;
  border-left: 6px solid transparent;
  border-bottom: 6px solid var(--preview-text-3);
}

.example-control:hover .control-icon {
  border-bottom-color: var(--preview-primary-color);
}

.example-control:hover {
  color: var(--preview-primary-color);
}

.example-actions-tip {
  position: absolute;
  left: 50%;
  transform: translate(-50%);
  font-size: 14px;
  color: var(--preview-green-3);
}
</style>图标组件
其中SfcPlayground.vue图标是用来把源码发送到 Vue 官方的演练场进行演示的
<template>
  <svg
    t="1596458647160"
    class="icon"
    viewBox="0 0 1024 1024"
    version="1.1"
    xmlns="http://www.w3.org/2000/svg"
    p-id="2840"
    xmlns:xlink="http://www.w3.org/1999/xlink"
    width="18"
    height="18"
  >
    <path
      d="M311.1 739c-6.1 0-12.2-2.3-16.8-7L69.7 507.4l224.6-224.6c9.3-9.3 24.3-9.3 33.6 0s9.3 24.3 0 33.6l-191 191 191 191c9.3 9.3 9.3 24.3 0 33.6-4.6 4.7-10.7 7-16.8 7zM711.5 739c-6.1 0-12.2-2.3-16.8-7-9.3-9.3-9.3-24.3 0-33.6l191-191-191-191c-9.3-9.3-9.3-24.3 0-33.6s24.3-9.3 33.6 0L953 507.4 728.3 732c-4.6 4.7-10.7 7-16.8 7zM418.5 814.7c-2.4 0-4.8-0.4-7.2-1.1-12.5-4-19.4-17.3-15.5-29.8l179.6-567.1c4-12.5 17.3-19.4 29.8-15.5 12.5 4 19.4 17.3 15.5 29.8L441.1 798.1a23.73 23.73 0 0 1-22.6 16.6z"
      fill="#666"
      p-id="2841"
    ></path>
  </svg>
</template><template>
<svg
t="1596458734865"
class="icon"
viewBox="0 0 1024 1024"
version="1.1"
xmlns="http://www.w3.org/2000/svg"
p-id="4898"
xmlns:xlink="http://www.w3.org/1999/xlink"
width="14"
height="14"
>
<path
d="M68.608 962.56V206.848h740.864V962.56H68.608zM746.496 271.36H131.584v629.248h614.912V271.36zM131.584 262.144"
p-id="4899"
fill="#666"
></path>
<path
d="M219.136 65.024v116.224h62.976V129.536h614.912v629.248h-60.416v61.952h123.392V65.024z"
p-id="4900"
fill="#666"
></path>
</svg>
</template><script lang="ts" setup>
import { computed } from 'vue'
const props = defineProps<{ code: string }>()
const sfcBaseUrl = 'https://play.vuejs.org/'
const sfcPlaygroundUrl = computed(() => {
const sfcJson = { 'App.vue': props.code }
return `${sfcBaseUrl}#${btoa(unescape(encodeURIComponent(JSON.stringify(sfcJson))))}`
})
</script>
<template>
<a :href="sfcPlaygroundUrl" target="_blank">
<svg
version="1.1"
id="Layer_1"
xmlns="http://www.w3.org/2000/svg"
xmlns:xlink="http://www.w3.org/1999/xlink"
widht="16"
height="16"
viewBox="0 0 1024 1024"
xml:space="preserve"
>
<g>
<path
d="M1004.57 319.408l-468-312c-15.974-9.83-33.022-9.92-49.142 0l-468 312C7.428 327.406 0 341.694 0 355.978v311.998c0 14.286 7.428 28.572 19.43 36.572l468 312.044c15.974 9.83 33.022 9.92 49.142 0l468-312.044c12-7.998 19.43-22.286 19.43-36.572V355.978c-0.002-14.284-7.43-28.572-19.432-36.57zM556 126.262l344.572 229.716-153.714 102.858L556 331.406V126.262z m-88 0v205.144l-190.858 127.43-153.714-102.858L468 126.262zM88 438.264l110.286 73.714L88 585.692v-147.428z m380 459.43L123.428 667.978l153.714-102.858L468 692.55v205.144z m44-281.716l-155.43-104 155.43-104 155.43 104-155.43 104z m44 281.716V692.55l190.858-127.43 153.714 102.858L556 897.694z m380-312.002l-110.286-73.714L936 438.264v147.428z"
p-id="2793"
fill="#555"
/>
</g>
</svg>
</a>
</template>导出container项目
新建packages/container/index.ts
export * from './hooks'
export { default } from './components/DemoPreview.vue'plugin项目开发
安装相关依赖
pnpm add markdown-it markdown-it-container hash-sum --filter ./packages/plugin
pnpm add unified remark-parse remark-stringify remark-frontmatter --filter ./packages/plugin
pnpm add -D @types/markdown-it @types/markdown-it-container @types/hash-sum --filter ./packages/plugin
pnpm add -D vite @types/unist --filter ./packages/pluginmarkdown插件
我们先只考虑在 markdown 的自定义容器中内嵌代码块的情况
新建packages/plugin/index.ts,然后编辑docs/.vitepress/config.ts把这个demoPreviewPlugin函数在 VitePress 的配置中注册一下
代码先暂时这样写,后续会补全逻辑,我们先来看看markdown-it中的tokens流是个什么东西
查看
import type MarkdownIt from 'markdown-it'
import container from 'markdown-it-container'

/**
 * markdown 插件的配置参数
 */
interface PreviewPluginOptions {
  /** docs文档路径 */
  docRoot: string
  /** 自定义容器组件名 */
  componentName?: string
}

/**
 * markdown插件,用来解析demo代码
 * @param md
 * @param options
 */
export function demoPreviewPlugin(md: MarkdownIt, options: PreviewPluginOptions = { docRoot: '' }) {
  options.componentName = options.componentName || 'DemoPreview'
  md.use(createDemoContainer, options)
}

/**
 * 自定义容器,也就是用:::demo  ::: 包裹起来的部分
 * @param md
 * @param options
 */
function createDemoContainer(md: MarkdownIt, options: PreviewPluginOptions) {
  const { componentName = 'DemoPreview', docRoot } = options
  md.use(container, 'demo', {
    validate(params: string) {
      return !!params.trim().match(/^demo\s*(.*)$/)
    },
    render(tokens: MarkdownIt.Token[], idx: number) {
      console.log('createDemoContainer =>', tokens)
      const token = tokens[idx]
      // 开始标签的 nesting 为 1,结束标签的 nesting 为 -1
      if (token.nesting === 1 && token.type === 'container_demo_open') {
        const lang = tokens[idx + 1].info
        const source = tokens[idx + 1].type === 'fence' ? tokens[idx + 1].content : ''
        // 这个componentName表示之后注册组件时所使用的组件名
        return `<${componentName} lang="${lang}" source="${encodeURIComponent(source)}">`
      }
      // 结束标签
      return `</${componentName}>`
    },
  })
}import { fileURLToPath, URL } from 'node:url'
import { demoPreviewPlugin } from '../../packages/plugin'
export default defineConfig({
// ...
markdown: {
config: (md) => {
const docRoot = fileURLToPath(new URL('../', import.meta.url))
md.use(demoPreviewPlugin, { docRoot })
},
},
})编辑docs示例项目的markdown-examples.md文件,把原本的内容清空掉,填入以下内容,然后启动示例项目
:::demo

```vue
<template>
  <div>{{ title }}</div>
</template>
<script setup>
import { ref, defineComponent } from 'vue'
const title = ref('this is basic demo')
</script>
```

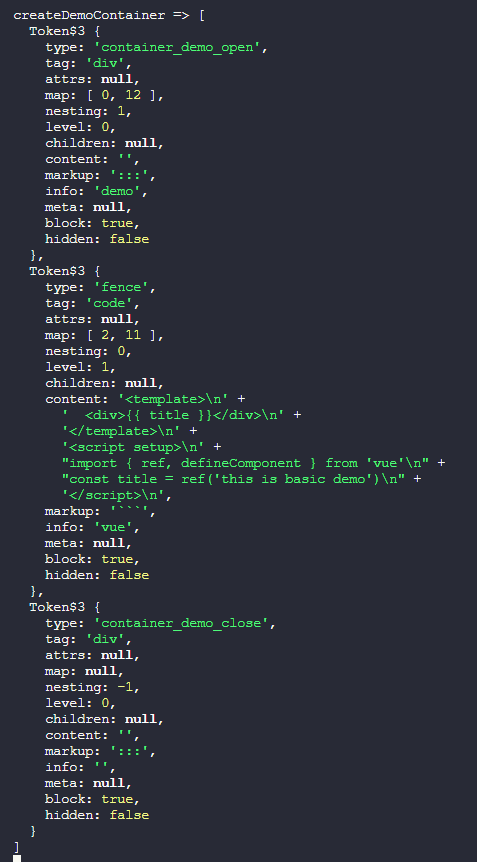
:::可以看到终端输出了以下内容
通过观察发现,tokens流是个对象数组,对象中的type值为container_demo_open且nesting为1时代表我们的自定义容器的开始标签;type值为fence的时候就是容器内部的代码块
新建docs/examples/Input.vue,在里面随便写点vue的代码
再编辑一下markdown-examples.md文件,添加如下内容,这表示在自定义容器中引入文件
:::demo src=examples/Input.vue
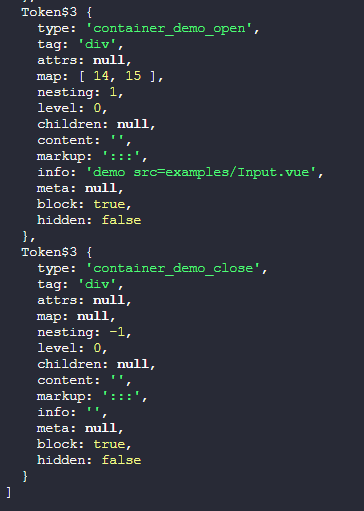
:::观察一下终端的输出可以看到,这次输出的tokens中没有type值为fence的节点数据了
了解以上这些规律后,我们就可以来补全markdown插件的代码了
编辑packages/plugin/index.ts
查看
import fs from 'node:fs'
import path from 'node:path'
import type MarkdownIt from 'markdown-it'
import container from 'markdown-it-container'
/**
 * markdown插件,用来解析demo代码
 * @param md
 * @param options
 */
export function demoPreviewPlugin(md: MarkdownIt, options: PreviewPluginOptions = { docRoot: '' }) {
  options.componentName = options.componentName || 'DemoPreview'
  md.use(createDemoContainer, options)
  md.use(renderDemoCode)
}

/**
 * 自定义容器,也就是用:::demo  ::: 包裹起来的部分
 * @param md
 * @param options
 */
function createDemoContainer(md: MarkdownIt, options: PreviewPluginOptions) {
  const { componentName = 'DemoPreview', docRoot } = options
  md.use(container, 'demo', {
    validate(params: string) {
      return !!params.trim().match(/^demo\s*(.*)$/)
    },
    render(tokens: MarkdownIt.Token[], idx: number) {
      const token = tokens[idx]
      // 开始标签的 nesting 为 1,结束标签的 nesting 为 -1
      if (token.nesting === 1 && token.type === 'container_demo_open') {
        const m = token.info.trim().match(/^demo\s*(src=.*)?$/)
        const sourceFile = m && m.length > 1 ? m[1]?.split('=')[1].trim() : ''
        let source = ''
        let lang = ''
        if (sourceFile) {
          lang = path.extname(sourceFile).slice(1)
          source = fs.readFileSync(path.resolve(docRoot, sourceFile), 'utf-8')
          if (!source) throw new Error(`Incorrect source file: ${sourceFile}`)
        } else {
          lang = tokens[idx + 1].info
          source = tokens[idx + 1].type === 'fence' ? tokens[idx + 1].content : ''
        }
        // 这个componentName表示之后注册组件时所使用的组件名
        return `<${componentName} :isFile="${!!sourceFile}" hlSource="${encodeURIComponent(
          md.options.highlight?.(source, lang, '') ?? ''
        )}" lang="${lang}" source="${encodeURIComponent(source)}">`
      }
      // 结束标签
      return `</${componentName}>`
    },
  })
}

/**
 * 解析渲染自定义容器内部的代码块
 * @param md
 */
function renderDemoCode(md: MarkdownIt) {
  // 这个 fence 就类似 ```vue ... ``` 代码块中的那个vue标识
  const defaultRender = md.renderer.rules.fence!
  md.renderer.rules.fence = (...args) => {
    const [tokens, idx] = args
    const token = tokens[idx]
    // 判断该 fence 是否在 ::: demo 内
    const prevToken = tokens[idx - 1]
    const isInDemoContainer =
      prevToken && prevToken.nesting === 1 && prevToken.info.trim().match(/^demo\s*(.*)$/)
    const lang = token.info.trim()
    // 如果在demo内的话就进行自定义渲染
    if (isInDemoContainer) {
      return `
        <template #highlight>
          <div v-pre class="example-source language-${lang}" >
            <span class="lang">${lang}</span>
            ${md.options.highlight?.(token.content, lang, '')}
          </div>
        </template>`
    }
    return defaultRender?.(...args)
  }
}Vite插件
首先编写的是configResolved和transform这两个钩子函数。configResolved用来收集需要用到的 Vite 配置,而transform则是用来解析 markdown 文件,提取出自定义 markdown 容器中的代码块,并将其转换为虚拟 Vue 组件模块。
编辑packages/plugin/index.ts,增加如下viteDemoPreviewPlugin函数
接着再编辑docs/vite.config.ts把这个viteDemoPreviewPlugin函数在 Vite 配置中注册一下
代码先暂时这样写,我们来看看transform钩子的两个参数具体是个什么东西
import type { Plugin } from 'vite'
/**
 * vite插件, 用来转换markdown中的demo代码
 */
export function viteDemoPreviewPlugin(): Plugin {
  // 用来收集已挂载的vite插件,因为在HMR那里需要手动更新
  let vitePlugin: any
  const options = {
    mode: 'vitepress',
    root: '',
  }
  return {
    name: 'vite-plugin-code-preview',
    enforce: 'pre',
    async configResolved(config) {
      const isVitepress = config.plugins.find((p) => p.name === 'vitepress')
      vitePlugin = config.plugins.find((p) => p.name === 'vite:vue')
      options.mode = isVitepress ? 'vitepress' : 'vite'
      options.root = path.resolve(config.root) // 提前抹平系统差异
    },
    // 把markdown中的demo代码块转换成组件
    async transform(code, id) {
      if (!id.endsWith('.md')) return
      console.log('transform.id =>', id)
      console.log('transform.code =>', code)
      return code
    },
  }
}import { viteDemoPreviewPlugin } from '../packages/plugin'
export default defineConfig({
plugins: [vueJsx(), viteDemoPreviewPlugin()],
})编辑一下markdown-examples.md文件,再次添加如下内容
<script setup>
  console.log('setup in markdown')
</script>启动docs示例项目,可以看到终端输出了以下内容
其中id就是 markdown 文件的路径,code就是 markdown 文件的内容
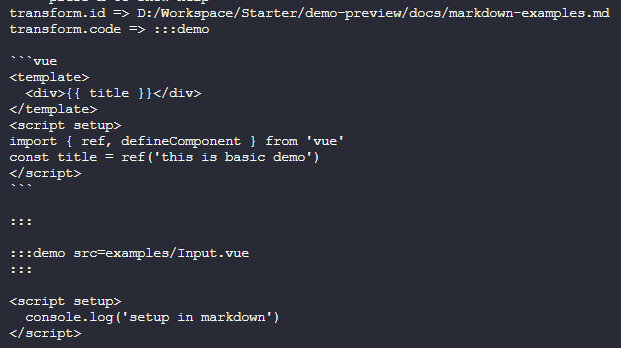
知道了这些信息后,我们就可以开始着手编写解析 markdown 文件内容的逻辑了
解析markdown
新建packages/plugin/remark.ts编写如下的markdownToComponent函数,接着编辑packages/plugin/index.ts,在transform钩子中调用markdownToComponent函数
代码先暂时这样,我们先来看看remark会把 markdown 文件内容解析成什么样
import { unified } from 'unified'
import remarkParse from 'remark-parse'
import remarkFrontmatter from 'remark-frontmatter'
import remarkStringify from 'remark-stringify'

/**
 * 把markdown中的demo代码转换为组件
 * @param code markdown的原始内容
 * @param id 模块id
 * @param root docs文档根目录
 */
export async function markdownToComponent(code: string, id: string, root: string) {
  // 解析markdown文件
  const parsed = await unified()
    .use(remarkParse) // 实例化parser, 用于生成 mdast
    .use(remarkFrontmatter) // 处理markdown的元信息
    .use(remarkStringify) // 实例化compiler, 用于将经过人为处理后的 mdast 输出为 markdown
    .process(code) // 执行解析
  console.log('markdownToComponent =>', parsed)
}import { markdownToComponent } from './remark'
export function viteDemoPreviewPlugin(): Plugin {
// ...
return {
// ...
async transform(code, id) {
if (!id.endsWith('.md')) return
await markdownToComponent(code, path.resolve(id), options.root)
return code
},
}
}可以看到,remark解析后的结果是一个虚拟文件对象,它是从mdast抽象语法树转换得来,里面包含了 markdown 文件中的所有内容,包括元信息、代码块
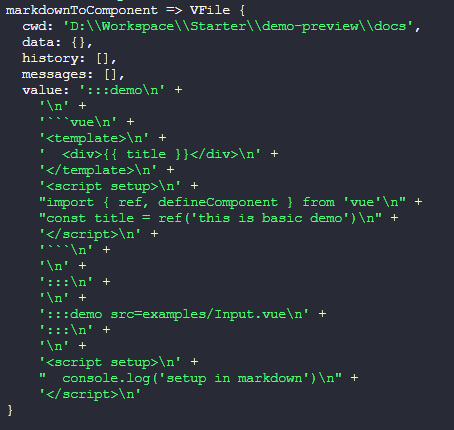
那么,如何从mdast抽象语法树中获取成我们想要的代码并转换成组件呢?答案就是remark的插件机制
我们可以自定义一个插件方法供remark的use管道进行调用,然后在这自定义的插件方法中提取出我们想要的 markdown 内容,然后转换成 Vue 组件
好,我们这就来试一试,把markdownToComponent函数改造一下,看看这次在终端中输出什么
import type { Node } from 'unist'
interface ExtraNode extends Node {
  children?: Array<ExtraNode>
  [key: string]: any
}
export async function markdownToComponent(code: string, id: string, root: string) {
  // 解析markdown文件
  const parsed = await unified()
    .use(remarkParse) // 实例化parser, 用于生成 mdast
    .use(remarkFrontmatter) // 处理markdown的元信息
    .use(() => (tree: ExtraNode) => {
      console.log('markdownToComponent =>', tree)
    })
    .use(remarkStringify) // 实例化compiler, 用于将经过人为处理后的 mdast 输出为 markdown
    .process(code) // 执行解析
}可以看到,这次输出的是mdast抽象语法树结构的数据了
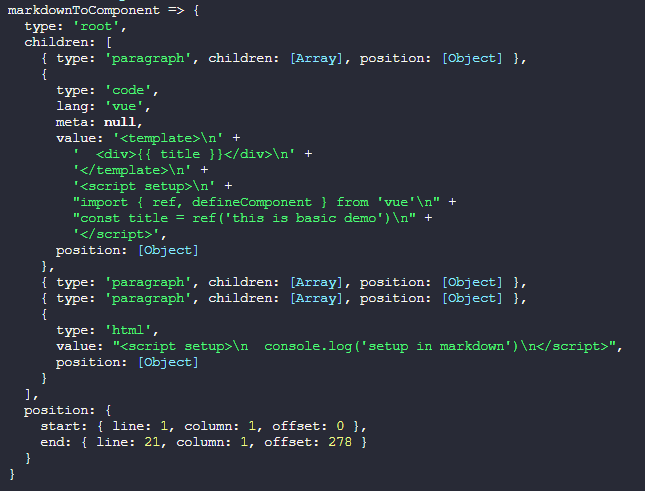
我们再改造一下自定义的remark插件方法,对mdast抽象语法树进行遍历一下
const parsed = await unified()
  .use(remarkParse) // 实例化parser, 用于生成 mdast
  .use(remarkFrontmatter) // 处理markdown的元信息
  .use(() => (tree: ExtraNode) => {
    tree.children?.forEach((node, index) => {
      console.log('markdownToComponent =>', node)
    })
  })
  .use(remarkStringify) // 实例化compiler, 用于将经过人为处理后的 mdast 输出为 markdown
.process(code) // 执行解析可以看到,这次输出的内容就完整了,观察一下找出规律,大致可以得出
- 每个节点如果存在
children字段并且其下标0的元素中的value字段以:::demo开头的话就是我们的自定义容器的起始标签 - 起始标签的下一个节点就是代码块的内容,其中
lang表示代码块的语言类型,value就是代码内容 - 如果是引入文件的情况,
:::demo后面会带有src=xxx之类的内容,可以使用正则表达式提取出来 - 如果 markdown 中直接插入 html 标签的话,节点数据中的
type值为html,而value就是这个标签对的内容(含标签)
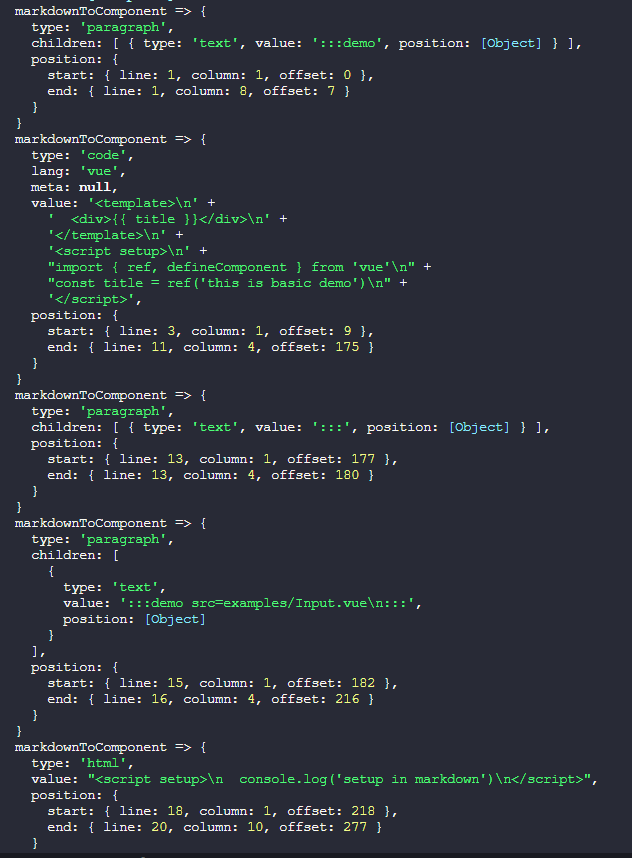
得到以上规律后,我们来补全一下markdownToComponent函数的逻辑
查看
import os from 'os'
import fs from 'fs'
import path from 'path'
import { unified } from 'unified'
import remarkParse from 'remark-parse'
import remarkFrontmatter from 'remark-frontmatter'
import remarkStringify from 'remark-stringify'
import type { Node } from 'unist'
import hash from 'hash-sum'

interface ExtraNode extends Node {
  children?: Array<ExtraNode>
  [key: string]: any
}
// 因为一个markdown文件就相当于一个SFC组件,所以只能存在一个setup,这个正则就是用来尝试找出是否已有setup
const ScriptSetupRegex = /^<script\s(.*\s)?setup(\s.*)?>([\s\S]*)<\/script>$/

/**
 * 将markdown文件和哈希值组合成虚拟模块名
 * @param id 模块id
 * @param key 代码块哈希值
 * @param lang 代码块所属语言
 */
const combineVirtualModule = (id: string, key: string, lang: string) =>
  `virtual:${path.basename(id)}.${key}.${lang}`

/**
 * 把markdown中的demo代码转换为组件
 * @param code markdown的原始内容
 * @param id 模块id
 * @param root docs文档根目录
 */
export async function markdownToComponent(code: string, id: string, root: string) {
  // 用来收集markdown中的demo代码块
  const _blocks: { lang: string; code: string; key: string }[] = []
  // 解析markdown文件
  const parsed = await unified()
    .use(remarkParse) // 实例化parser, 用于生成 mdast
    .use(remarkFrontmatter) // 处理markdown的元信息
    .use(() => (tree: ExtraNode) => {
      let seed = 0
      const scriptSetup = { index: -1, content: '' }
      tree.children?.forEach((node, index) => {
        try {
          // 判断是否已经存在 script setup 标签, 注释的忽略不处理
          if (node.type === 'html') {
            const m = node.value.trim().match(ScriptSetupRegex)
            if (!m) return false
            scriptSetup.index = index
            scriptSetup.content = m[3] ?? ''
          }
          if (!node.children || !node.children[0].value) return false
          // 判断demo容器是否为内联代码块的模式
          const hasDemo = node.children[0].value.trim().match(/demo\s*(.*)$/)
          const nextNodeIsCode = hasDemo && tree.children![index + 1].type === 'code'
          // 下一个节点如果是内联代码块的话
          if (nextNodeIsCode) {
            const hashKey = hash(`${id}-demo-${seed}`)
            _blocks.push({
              lang: tree.children![index + 1].lang,
              code: tree.children![index + 1].value,
              key: hashKey, // 每个代码块的唯一key
            })
            node.children[0].value += ` Virtual-${hashKey}`
            seed++
          }
          // 判断demo容器是否为引入文件的模式
          const hasSrc = node.children[0].value.trim().match(/^:::demo\s*(src=.*)\s*:::$/)
          if (hasSrc) {
            const markdownId = path.relative(root, id)
            const sourceFile = hasSrc && hasSrc.length > 1 ? hasSrc[1]?.split('=')[1].trim() : ''
            // 记录当前markdown使用了哪些组件
            handleCacheFile(markdownId, path.join(sourceFile))
            const lang = path.extname(sourceFile).slice(1)
            const source = fs.readFileSync(path.resolve(root, sourceFile), 'utf-8')
            const hashKey = hash(`${id}-demo-${seed}`)
            _blocks.push({
              lang,
              code: source,
              key: hashKey,
            })
            node.children[0].value = `:::demo src=${sourceFile} Virtual-${hashKey}${os.EOL}:::`
            seed++
          }
        } catch (error) {
          console.error('parse markdown error in function transformCodeToComponent')
          return false
        }
      })
      if (_blocks.length === 0) return

      const virtualModules = _blocks
        .map((b) => {
          const moduleName = combineVirtualModule(id, b.key, b.lang)
          return `import Virtual${b.key} from '${moduleName}'`
        })
        .join(os.EOL)
      // 如果之前已经有一个 setup 的话,那就把虚拟模块塞进去
      if (scriptSetup.index !== -1) {
        const node = tree.children![scriptSetup.index]
        node.value = node.value.replace(ScriptSetupRegex, (m: string, ...args: string[]) => {
          return `<script ${args[0] ?? ''} setup ${args[1] ?? ''}>${os.EOL}${virtualModules}${
            os.EOL
          }${args[2] ?? ''}</script>`
        })
      } else {
        // 如果没有setup的话,就新增一个用来将虚拟模块追加到markdown
        tree.children?.push({
          type: 'html',
          value: `<script setup>${os.EOL}${virtualModules}${os.EOL}</script>`,
        })
      }
    })
    .use(remarkStringify) // 实例化compiler, 用于将经过人为处理后的 mdast 输出为 markdown
    .process(code) // 执行解析

  const blocks = _blocks.map((b) => {
    const moduleName = combineVirtualModule(id, b.key, b.lang)
    cacheCode.set(b.key, b.code)
    return { ...b, id: moduleName }
  })
  return { parsedCode: String(parsed), blocks }
}

/**
 * 将markdown文件和所引用的组件关系缓存起来
 * @param mdId markdown 文件
 * @param file 组件
 */
function handleCacheFile(mdId: string, file: string) {
  const prev: string[] = cacheFile.get(mdId) ?? []
  const files = Array.from(new Set([...prev.filter(Boolean), file]))
  cacheFile.set(mdId, files)
}

export const cacheCode = new Map<string, string>()
export const cacheFile = new Map<string, string[]>()⚡ 简单解释一下
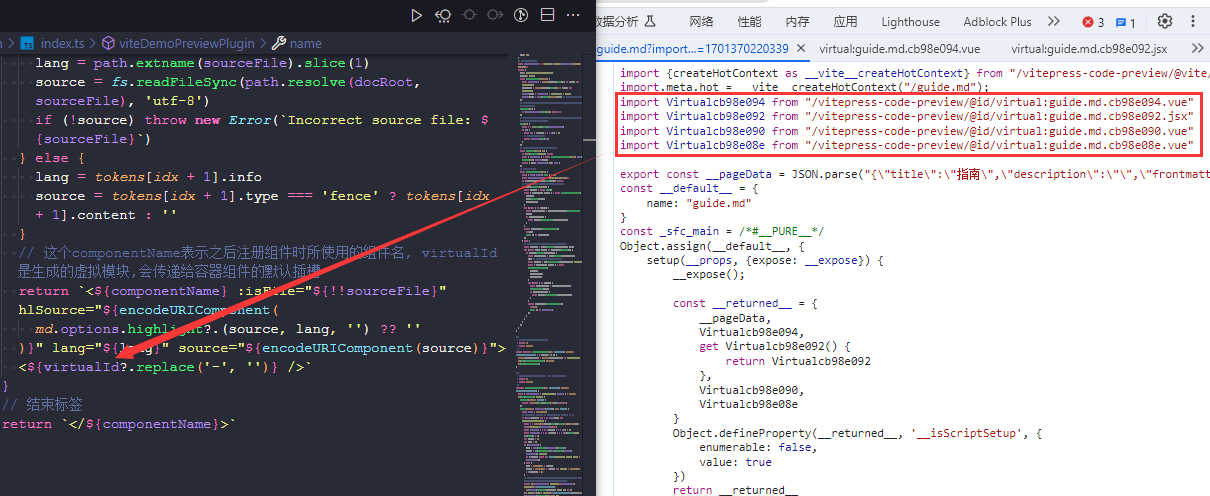
ScriptSetupRegex这个正则表达式是用来匹配 markdown 文件中是否已经存在一个带setup的<script>标签;如果存在,就把虚拟模块塞进这个标签中,否则就创建一个<script setup>标签。之所以这么做是因为 Vue 规定了每个 SFC 组件只能存在一个<script setup>标签,而 VitePress 会把 markdown 文件解析成一个 SFC 组件_blocks数组是用来收集自定义 markdown 容器中的代码块内容,在remark解析完毕后对收集到的代码块进行遍历,并使用cacheCode这个Map对象将其缓存下来,同时将其转为虚拟模块hash-sum这个包的作用是根据指定的参数生成哈希值,以保证每次遍历 markdown 文件时的哈希值不会改变Virtual-${hashKey}追加到:::demo的后面是为了给 markdown 渲染时用的,它在渲染成VNode时表示虚拟组件的插入点- 当使用引入文件的模式时,
cacheFile这个Map对象是用来保存每个 markdown 文件所引用到的文件,手动管理 HMR 更新时需要用到
resolveId和load钩子
markdownToComponent函数的逻辑完成后,我们修改一下transform钩子,拿到它的返回值
export function viteDemoPreviewPlugin(): Plugin {
  // ...
  return {
    // ...
    async transform(code, id) {
      if (!id.endsWith('.md')) return
      const { parsedCode } = await markdownToComponent(code, path.resolve(id), options.root)
      return { code: parsedCode, map: null }
    },
  }
}这时,示例项目应该会出现类似下面这样的错误

不要慌,这是因为之前的 markdown 插件中的createDemoContainer函数中的正则表达式还没有处理Virtual-${hashKey}的情况,也就是上文提到的 markdown 渲染成VNode时虚拟组件的插入点
现在来补一下
function createDemoContainer(md: MarkdownIt, options: PreviewPluginOptions) {
  md.use(container, 'demo', {
    // ...
    render(tokens: MarkdownIt.Token[], idx: number) {
      const token = tokens[idx]
      if (token.nesting === 1 && token.type === 'container_demo_open') {
        const m = tokens[idx].info.trim().match(/^demo\s*(src=.*\s)?(Virtual-([a-zA-Z0-9]+))?$/)
        const virtualId = m && m.length > 2 ? m[2] : ''
        // ...
        return `<${componentName} :isFile="${!!sourceFile}" hlSource="${encodeURIComponent(
          md.options.highlight?.(source, lang, '') ?? ''
        )}" lang="${lang}" source="${encodeURIComponent(source)}">
        <${virtualId?.replace('-', '')} />`
      }
      // 结束标签
      return `</${componentName}>`
    },
  })
}上面的操作完成后重新启动docs示例项目,这时又出现新的报错,它的意思是虚拟模块的路径在文件系统中找不到,所以报错
这是因为 Vite 插件viteDemoPreviewPlugin中缺少了resolveId和load钩子函数,其中resolveId用来识别指定的虚拟模块,load用来加载被识别到的指定虚拟模块

编辑viteDemoPreviewPlugin函数,补上这两个钩子
import { cacheCode, markdownToComponent } from './remark'
export function viteDemoPreviewPlugin(): Plugin {
  // ...
  // 用来匹配虚拟模块
  const virtualModRegex = /^virtual:.*\.md\.([a-zA-Z0-9]+)\.(vue|jsx|tsx)$/
  return {
    // ...
    // 解析虚拟模块ID,如果请求的模块ID与预期的虚拟模块ID匹配,则返回该ID,否则返回undefined
    resolveId(id) {
      if (virtualModRegex.test(id)) return id
    },
    // 加载虚拟模块的内容,如果请求的模块ID与预期的虚拟模块ID匹配,则生成模块内容并返回,否则返回undefined
    load(id) {
      const m = id.trim().match(virtualModRegex)
      if (m) {
        const key = m.length > 1 ? m[1] : ''
        // 返回虚拟模块的源码
        return cacheCode.get(key)
      }
    },
  }
}这回好了,没有报错,但是页面没有显示demo内嵌代码模式的示例,咋回事?

因为我们还没在 VitePress 中注册之前编写好的container容器组件
新建docs/.vitepress/theme/index.ts,添加如下代码
import type { Theme } from 'vitepress'
import DefaultTheme from 'vitepress/theme'
import DemoPreview, { useComponents } from '../../../packages/container'

export default {
  ...DefaultTheme,
  enhanceApp(ctx) {
    const { app } = ctx
    useComponents(app, DemoPreview)
  },
} satisfies Theme刷新页面,这回可以看到示例项目已经正确的渲染出来了
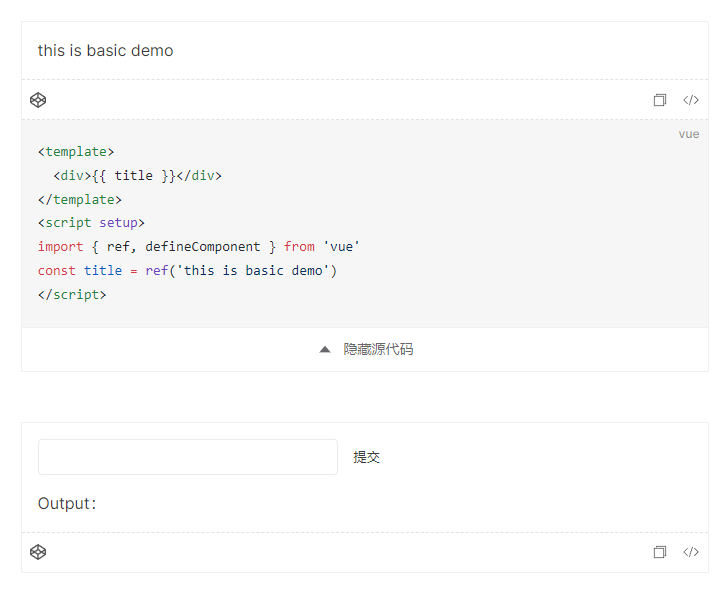
但是此时修改示例代码还不会触发重新渲染,而修改 markdown 文件虽然会触发 Vite 默认的 HMR,但不会重新加载虚拟模块。这是因为之前加载虚拟模块的代码是发生在load钩子中的,而此钩子在编译阶段成功加载到数据后就不会重复加载了,所以此时虚拟模块的代码还是旧的
handleHotUpdate钩子
修改viteDemoPreviewPlugin函数,给它增加handleHotUpdate钩子,自己维护指定虚拟模块的 HMR 行为
查看
import { cacheCode, cacheFile, markdownToComponent } from './remark'
export function viteDemoPreviewPlugin(): Plugin {
  // ...
  return {
    // ...
    // 自定义HMR更新
    async handleHotUpdate(ctx) {
      const { file, server, read } = ctx
      const manualUpdateRegex = /\.(md|vue|jsx|tsx)$/
      if (!manualUpdateRegex.test(file)) return
      // 正向更新,通过markdown文件更新内部代码块
      if (file.endsWith('.md')) {
        const content = await read()
        const { parsedCode, blocks } = await markdownToComponent(
          content,
          path.resolve(file),
          options.root
        )
        for (const b of blocks) {
          const virtualModule = server.moduleGraph.getModuleById(b.id)
          if (virtualModule) {
            await server.reloadModule(virtualModule)
          }
        }
        return vitePlugin.handleHotUpdate({
          ...ctx,
          read: () => parsedCode,
        })
      } else {
        // 反向更新,通过被引用的组件来更新markdown
        const fileName = path.relative(options.root, file)
        for (const [key, value] of cacheFile.entries()) {
          if (value.includes(fileName)) {
            const markdownPath = path.resolve(options.root, key) // 组合完整的markdown文件路径
            const content = fs.readFileSync(markdownPath, 'utf-8')
            const { parsedCode, blocks } = await markdownToComponent(
              content,
              markdownPath,
              options.root
            )
            for (const b of blocks) {
              const virtualModule = server.moduleGraph.getModuleById(b.id)
              if (virtualModule) {
                await server.reloadModule(virtualModule)
              }
            }
            return vitePlugin.handleHotUpdate({
              ...ctx,
              read: () => parsedCode,
            })
          }
        }
      }
    },
  }
}现在,我们修改 markdown 中的示例代码,可以发现已经会触发重新渲染了
⚡ 到这里,子项目的开发工作已经完成,接下来进入打包配置环节
container项目打包
先安装一个依赖,用来给组件生成d.ts文件
pnpm add vite-plugin-dts -D --filter ./packages/container接着新建packages/container/vite.config.ts,填入如下配置
import { resolve } from 'path'
import { defineConfig } from 'vite'
import vue from '@vitejs/plugin-vue'
import dts from 'vite-plugin-dts'
export default defineConfig({
  build: {
    minify: false,
    lib: {
      entry: resolve(__dirname, './index.ts'),
      name: 'preview-container',
      fileName: 'index',
    },
    rollupOptions: {
      external: ['vue', 'vite', 'vitepress'],
      output: {
        globals: {
          vue: 'Vue',
        },
      },
    },
  },
  plugins: [vue(), dts({ insertTypesEntry: true })],
})然后编辑packages/container/package.json,添加打包脚本、文件导出配置以及作者信息之类的,比如
{
  "name": "@vitepress-code-preview/container",
  "version": "1.0.0",
  "description": "preview component of code and component in vitepress",
  "keywords": ["Vite", "VitePress", "Vue", "plugin", "demo", "preview", "JSX", "TSX"],
  "author": "welives",
  "license": "MIT",
  "type": "module",
  "main": "./dist/index.umd.cjs",
  "module": "./dist/index.js",
  "types": "./dist/index.d.ts",
  "exports": {
    ".": {
      "import": "./dist/index.js",
      "require": "./dist/index.umd.cjs"
    },
    "./dist/style.css": "./dist/style.css"
  },
  // 这个 files 是告诉 npm 要上传的文件有哪些
  "files": ["dist", "README.md", "CHANGELOG.md", "package.json", "LICENSE"],
  "scripts": {
    "dev": "vite build --watch",
    "build": "vite build"
  },
  "homepage": "https://github.com/welives/vitepress-code-preview",
  "repository": {
    "type": "git",
    "url": "git@github.com:welives/vitepress-code-preview.git"
  }
  // ...
}执行container项目的打包脚本pnpm build,不出意外的话应该是打包成功的
plugin项目打包
我们使用 Rollup 来打包这个 plugin 项目,安装一下依赖
pnpm add rollup rollup-plugin-ts -D --filter ./packages/plugin新建packages/plugin/rollup.config.mjs,填入如下配置
import ts from 'rollup-plugin-ts'
export default {
  input: 'index.ts',
  output: [
    {
      file: 'dist/index.cjs',
      format: 'cjs',
    },
    {
      file: 'dist/index.js',
      format: 'es',
    },
  ],
  plugins: [ts()],
  watch: { exclude: 'node_modules/**' },
  external: ['vite', 'vitepress'],
}编辑packages/plugin/package.json,和container项目的差不多,比如
{
  "name": "@vitepress-code-preview/plugin",
  "version": "1.0.0",
  "description": "preview component of code and component in vitepress",
  "keywords": ["Vite", "VitePress", "Vue", "plugin", "demo", "preview", "JSX", "TSX"],
  "author": "welives",
  "license": "MIT",
  "type": "module",
  "main": "./dist/index.cjs",
  "module": "./dist/index.js",
  "types": "./dist/index.d.ts",
  "exports": {
    ".": {
      "import": "./dist/index.js",
      "require": "./dist/index.cjs"
    }
  },
  "files": ["dist", "README.md", "CHANGELOG.md", "package.json", "LICENSE"],
  "scripts": {
    "dev": "rollup -c --watch",
    "build": "rollup -c"
  },
  "homepage": "https://github.com/welives/vitepress-code-preview",
  "repository": {
    "type": "git",
    "url": "git@github.com:welives/vitepress-code-preview.git"
  }
}执行plugin项目的打包脚本pnpm build,不出意外的话应该是打包成功的
测试构建产物
编辑docs/package.json,在生产依赖dependencies添加如下内容,然后执行一下pnpm install,否则docs项目中的node_modules就拿不到构建产物
{
  "dependencies": {
    "@vitepress-code-preview/container": "workspace:*",
    "@vitepress-code-preview/plugin": "workspace:*"
  }
}接着编辑docs/vite.config.ts、docs/.vitepress/config.ts和docs/.vitepress/theme/index.ts,把之前开发时用的相对路径改成子项目的包名
import { viteDemoPreviewPlugin } from '@vitepress-code-preview/plugin'import { demoPreviewPlugin } from '@vitepress-code-preview/plugin'import DemoPreview, { useComponents } from '@vitepress-code-preview/container'
import '@vitepress-code-preview/container/dist/style.css'执行docs项目的pnpm docs:dev启动开发环境进行测试,没问题的话再执行pnpm docs:build打包。打包完成后执行pnpm docs:preview进行预览
预览也没问题的话,就编辑主项目的package.json,添加一些脚本命令,便于直接在主项目调用子项目的脚本
{
  "scripts": {
    "docs:dev": "pnpm --filter=code-preview-example docs:dev",
    "docs:preview": "pnpm --filter=code-preview-example docs:preview",
    "docs:build": "pnpm --filter=code-preview-example docs:build",
    "build": "pnpm container:build && pnpm plugin:build",
    "container:dev": "pnpm --filter=@vitepress-code-preview/container dev",
    "container:build": "pnpm --filter=@vitepress-code-preview/container build",
    "plugin:dev": "pnpm --filter=@vitepress-code-preview/plugin dev",
    "plugin:build": "pnpm --filter=@vitepress-code-preview/plugin build"
  }
}发布前准备
准备要发布了,完善一下主项目的package.json,把作者信息、仓库地址、关键字之类的填上
{
  "name": "vitepress-code-preview",
  "version": "1.0.0",
  "description": "preview component of code and component in vitepress",
  "keywords": ["Vite", "VitePress", "Vue", "JSX", "TSX", "demo", "preview"],
  "author": "welives",
  "license": "MIT",
  "homepage": "https://github.com/welives/vitepress-code-preview",
  "repository": {
    "type": "git",
    "url": "git@github.com:welives/vitepress-code-preview.git"
  }
  // ...
}README拷贝脚本
README 使用文档的编写直接略过
安装 esno ,用来直接执行 TS 脚本文件
pnpm add esno -wD编辑主项目的package.json,添加一个copy脚本命令
{
  "scripts": {
    // ...
    "copy": "esno ./scripts/copy.ts"
  }
}在主项目中新建scripts/copy.ts,填入如下内容,作用是把主项目的 README.md 拷贝到要发布 npm 的子项目中
import { copyFileSync } from 'fs'
import { resolve } from 'path'

const getFileAbsolutePath = (path: string) => resolve(__dirname, path)

const copyFile = (copyPath: string, targetPath: string) => copyFileSync(copyPath, targetPath)

export const copyReadmeFile = (targetPaths: string[]) => {
  const README_PATH = getFileAbsolutePath('../README.md')
  targetPaths.forEach((target: string) => {
    copyFile(README_PATH, getFileAbsolutePath(target))
  })
}
// 复制README.md文件至所有packages包中
copyReadmeFile(['../packages/container/README.md', '../packages/plugin/README.md'])编辑主项目的tsconfig.json,增加如下include字段
{
  "include": ["scripts"]
}管理版本及更新日志
我这里使用的是 @changesets/cli 这个包来进行管理
pnpm add -wD @changesets/cli @changesets/changelog-github
pnpm changeset init编辑.changeset/config.json
{
  "$schema": "https://unpkg.com/@changesets/config@3.0.0/schema.json",
  "changelog": "@changesets/cli/changelog",
  "commit": false,
  "fixed": [],
  "linked": [["@vitepress-code-preview/container", "@vitepress-code-preview/plugin"]],
  "access": "public",
  "baseBranch": "main",
  "updateInternalDependencies": "patch",
  "ignore": [],
  "___experimentalUnsafeOptions_WILL_CHANGE_IN_PATCH": {
    "onlyUpdatePeerDependentsWhenOutOfRange": true
  }
}编辑主项目的package.json,添加如下脚本命令
{
  "scripts": {
    // ...
    "changeset": "changeset",
    "changeset-version": "changeset version"
  }
}生成日志的步骤:执行pnpm changeset,构建日志信息
- ①首先是让你选择哪些项目需要生成更新信息

- ②这一步是让你选择哪些项目需要进行
major级别(就是主版本号更新)的更新,如果不需要则按回车跳过

- ③这一步是让你选择哪些项目需要进行
minor级别(就是次版本号更新)的更新,如果不需要则按回车跳过

- ④如果前两个选择都跳过了,那么直接就是
patch级别(就是补丁版本号更新)的更新了,会让你输入更新信息

- ⑤最后一步是让你确认操作是否没问题,没问题的话按回车同意会生成更新文件等待应用

- ⑥执行
pnpm changeset-version应用更新信息
在终端登录npm账号
如果还没有 npm 账号的话,先去注册一个
如果当前不是使用官方源的话,需要先切到官方源 npm config set registry https://registry.npmjs.org
在终端中进入到你要发布的项目目录,执行如下命令
npm login
⚡ 提示

如果提示你打开浏览器进行操作的话,那么需要对 nodejs 进行降级处理,这里以降级到16.19.0版本为例。
因为我是用nvm管理的 nodejs 版本,所以降级命令如下:
nvm install 16.19.0
nvm use 16.19.0发布到npm
发布前记得要先打包
如果要发布的包没带有命名空间(就是包名以@开头的)的话,那么直接执行 pnpm publish 即可
如果带有命名空间的话,那么需要执行 pnpm publish --access public,前提必须要有权限或命名空间真实存在,否则会报错
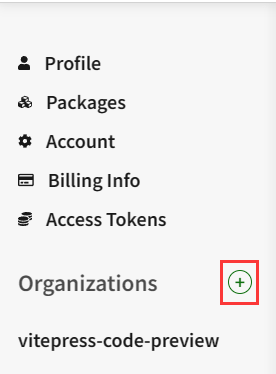
如果不存在命名空间,你可以自己创建一个。去 npm 官网登录你的账号,在个人设置页可以找到创建入口
创建完毕后执行pnpm publish --access public
⚡注意
如果想单独发布子项目的话,需要进入到子项目的目录,然后执行pnpm publish --access public
示例项目部署到Github Pages
编辑docs/.vitepress/config.ts,修改base的值为你的 Github 仓库名称,比如我这里是/vitepress-code-preview
// ...
export default defineConfig({
  base: '/vitepress-code-preview',
  // ...
})主项目新建.github/workflows/deploy-docs.yml,填入如下内容
然后推送main分支代码给 Github 仓库后会自动执行部署
查看
# 工作流名称
name: Build and Deploy Example

# 用于描述工作流的何时触发
on:
  workflow_dispatch: {}
  push:
    branches: [main]
  pull_request:
    branches:
      - main

# 设置GITHUB_TOKEN的权限
permissions:
  contents: read
  pages: write
  id-token: write

# Allow only one concurrent deployment, skipping runs queued between the run in-progress and latest queued.
# However, do NOT cancel in-progress runs as we want to allow these production deployments to complete.
concurrency:
  group: pages
  cancel-in-progress: false

# 工作流里的任务
jobs:
  # 构建
  build:
    # 指定该任务运行的系统,目前可选的有 ubuntu、windows、和 macOS
    runs-on: ubuntu-latest
    # 任务里的运行步骤
    steps:
      # 代码检出
      - name: Checkout
        uses: actions/checkout@v4
        with:
          fetch-depth: 0
      # 安装 Node.js
      - name: Install Node.js
        uses: actions/setup-node@v4
        with:
          node-version: 16
      # 配置 github pages
      - name: Setup Pages
        uses: actions/configure-pages@v3
      # 安装 pnpm
      - name: Install pnpm
        uses: pnpm/action-setup@v2
        with:
          version: 8
          run_install: false
      # 设置 pnpm 缓存目录
      - name: Get pnpm store directory
        shell: bash
        run: |
          echo "STORE_PATH=$(pnpm store path --silent)" >> $GITHUB_ENV
      - uses: actions/cache@v3
        name: Setup pnpm cache
        with:
          path: ${{ env.STORE_PATH }}
          key: ${{ runner.os }}-pnpm-store-${{ hashFiles('**/pnpm-lock.yaml') }}
          restore-keys: |
            ${{ runner.os }}-pnpm-store-
      # 安装依赖
      - name: Install dependencies
        run: pnpm install --no-frozen-lockfile
      # 插件打包
      - name: Build plugin
        run: pnpm build
      # 示例项目打包
      - name: Build with VitePress
        run: |
          pnpm docs:build
          touch docs/.vitepress/dist/.nojekyll
      # 上传到 Github Pages 部署环境
      - name: Upload artifact
        uses: actions/upload-pages-artifact@v2
        with:
          path: docs/.vitepress/dist
  # 部署到GitHubPages
  deploy:
    environment:
      name: github-pages
      url: ${{ steps.deployment.outputs.page_url }}
    needs: build
    runs-on: ubuntu-latest
    steps:
      # 部署 GitHub Pages
      - name: Deploy to GitHub Pages
        id: deployment
uses: actions/deploy-pages@v2🎉 完结撒花

到这里,此笔记就全部结束了,感谢大家的阅读,希望对大家有所帮助。